Ask the Expert: Why you should implement OpenID Connect (OIDC) and how to do it
We had a problem with our deployment pipelines. It is not that they didn’t work, they did, and have done for years at this point. The problem was the access keys that grant the pipelines access to AWS resources had not been rotated in an exceedingly long time.
The AWS Security advisor had picked up that we had not rotated our access keys within 90 days and informed us with a big friendly red cross.

From here we went over to the IAM (Identity Access Management) – User section and looked at the active key age for some of our pipeline deployment credentials. Which confirmed that the keys had in fact not been rotated within 90 days!

To fix this we could have gone into the IAM user and rotated the users’ access and secret keys, gone over to Bitbucket or GitHub and updated the secret/environment variable, then if we were feeling particularly diligent, we could have created a recurring ticket in our system to perform this tedious action every 90 days from now until the end of time (or more realistically forgotten about it for another year or two and then gone through the entire process again in the future). We knew there had to be a better way to do this without all the toil associated with it, and happily there is.
Step forward OpenID Connect (OIDC). OIDC is an authentication protocol used to verify a user’s identity this can be used with Open Authorisation (OAuth) to provide an authentication layer on top of the authorisation layer from OAuth. Which is fine but how does it help us?
GitHub has a nice description of how “OpenID Connect (OIDC) allows your GitHub Actions workflows to access resources in Amazon Web Services (AWS), without needing to store the AWS credentials as long-lived GitHub secrets.” Which sounds exactly what we want.
To get up and running, we first need to setup the following things in AWS, an identity provider, a role for use by GitHub, and a policy that we will grant to the role.
Firstly, we created an identity provider for GitHub to use to communicate with AWS. This done in the IAM portal – Identity Providers.
- Select OpenID Connect as the provider type
- Set the provider URL as token.actions.githubusercontent.com
- Set the audience to amazonaws.com
- Add tags if you need them
Finally, click Add provider

Once it is added it should appear in the list of Identity providers.

Now that the provider is added we need to create a Role that the GitHub action can assume to perform its deployments.
To do this navigate to the IAM portal – Roles and click Create role
Next, select the Trusted entity type Custom trust policy

Once you have clicked Custom trust policy a new code window will appear at the bottom of the screen. We will need to define our custom policy here.
Below are two examples of policies, one with a broad subject and another with a tightly scoped subject.
- Set the principal to the arn of the identity provider we created previously.
- Set the audience (aud) to be amazonaws.com
- Set the subject (sub) to the scope of the request, see below for some examples.
In this example we set the subject to all repositories in our GitHub organisation “repo:GreystoneUK/*”.

In this example we have set the subject to reference a specific repository in our GitHub organisation called OIDCExampleRepo and reference only the main branch.

Once the trust policy is defined, click Next
We will then be prompted to select a permissions policy to assign to the role, for our example we will be using the AWSCodeDeployDeployerAccess policy.

Once you have selected the appropriate policies click Next
Give the role a name and description (be kind and write a decent description for the admins who come after you).

Check your trusted entities look correct.
Check you have assigned the correct permission policies and add tags to the role. Then click Create role.

Once the identity provider and role are in place, we can start to use them in our GitHub Actions.
📝 This assumes you already have a working GitHub workflow pipeline that needs upgrading and will not go into the details of setting workflows from scratch.
Here is our original workflow file that uses an AWS Access key and Secret key stored as GitHub secrets to authenticate to AWS CodeDeploy to push out our web app.

We need to update our workflow to add permission to access the OIDC token and update the aws-actions/aconfigure-aws-credentials step to assume the role.
- Set permissions for the job/workflow to write to the id-token
- Set permissions to for the job/workflow to read the contents of the token
- Set configure-aws-credentials step to assume the role we defined previously (referenced by the role arn).

Once the workflow is updated to use OIDC, we can run the workflow and see if it has worked.
Here we can see the configure aws credentials step set assume role permissions, then the Create CodeDeploy Deployment step successfully created a new deployment using those permissions.

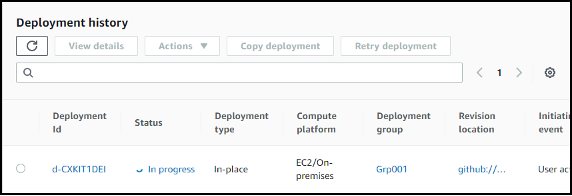
Here is the corresponding deployment running in AWS CodeDeploy.

Once we have confirmed this is working using OIDC we can remove the AWS_ACCESS_KEY_ID and the AWS_SECRET_ACCESS_KEY from the repository secrets and finally remove the IAM user and their access keys from AWS.
At this point we have successfully updated our workflow from using named IAM users with incredibly old access keys to using very shorted lived assumed credentials for our pipelines.
Links:


